GHC shows live metrics directly from PCO data. You will need to authorise GHC to connect with Google Looker Studio and PCO. Note that we do not store any information other than what you shared with us during registration.
a) Click Authorise
Be sure to authorise your google account with the one you stated when registered your GHC account.
b) You will be redirected to a Planning Center webpage. Click “Allow”
Sometimes you will need to refresh the dashboard in your browser after completing this step. If the gauges are show data then proceed to the next step to confirm.
This once-off setup process will take about 10 minutes to walk through. You’ll be guided through preparing your elvanto settings to connect with the GHC dashboard.
There are 5 assumptions we’ve made about your basic church management system setup. For GHC to work effectively you should be:
People’s details are recorded
People are assigning a people category related to their “connected-ness” to your church (eg Newcomer, Member).
People are added to groups in a category for small group ministry.
People are designated in serving positions as Volunteers
Congregations are designated by distinct locations
The first part of of this setup will involve preparing your Elvanto account to connect with GHC. The process of setting this up and using GHC will also help you use Elvanto better.
1. Assign People Categories
People categories help map the movement of people from newcomer to members. You might have several people categories that represent newcomers and members but these two basic concepts is important to differentiate. The goal is that we want newcomers to become members and we want members to express their membership in attending, serving and discipleship (and giving).
Setup
a) Select “Customize Fields” from People Settings dropdown
b) Amend Membership Types as needed
In this example types considered as members within GHC are:
Member (auto assigned by name)
Regular Attender (auto assigned by name “Regular”)
Crowd_ (manual assigned by “_” suffix)
Note also you can exclude membership types to keep your metrics tight. In this case for GHC we’re excluding Community Contacts* by adding the star suffix. Any type with this suffix will be removed.
These leaves the membership type “Visitor” for people who are not (yet) a member of your church.
2. Discipleship Groups
In a similar way, GHC needs to know which of your groups are part of your discipleship structure. Any group with a “_” suffix will considered as such. You could include traditional bible study groups and/or discipleship/prayer triplets. Essentially whatever you want members to participate in for their spiritual growth.
a) In Groups Select “Manage Group Types”
b) Select “Settings” of each relevant type to add “_” to the end of the name.
Be sure to follow these instructions and click “Complete Setup” at end to update your profile and return to the dashboards.
Why the extra steps?
GHC can directly access basic Elvanto data. It cannot directly access attendance reports. In the next two steps you will create service and group attendance reports. But even then GHC can’t access them ordinarily… so we’ll get you to create some “dummy” groups that GHC can access and you’ll put the report links in the group attributes fields (which GHC can access). This is the best method we’ve found to supplement the API connector. Follow the steps below and once it’s setup then you won’t need to worry about this again.
Once you’ve done these two steps be sure to click that button at end to say you’ve completed this step to return to onboarding. If you have any issues use the support link on last page or from menu.
Setup Service Attendance Report
Setup Shared Attendance Report
Create a new comprehensive report (Admin > Reports page > “Add Comprehensive Report” button)
Add a title (whatever you choose). You do not need a description or category.
Click “Add Report Item” and select “Service Individual Attendance” built-in report as an item
Set:
Date Range last 12 months
Only people that did attend
Filter services and people by relevant locations
Hide times absent and attended column
Show individual service grid (This is a new feature Elvanto introduced. The report won’t be recognised by GHC without this checked)
Additional people columns
Preferred Name
Date added
MemberID
People Category
Select “Add to report”
Click “Generate Report”
Click “Share”
Set Access to Anyone with the link and copy link to the clipboard
Close
Setup individual service attendance report
Create group for GHC connector to access report
Add Group
Group Name must be: “Report of Service Individual Attendance“
In the group Address field, paste the report link from the clipboard
Save
Group with link to attendance report
Setup Group Attendance Report
You’ll now need to repeat the same process for the groups attendance report (including creating another “dummy” group for GHC to access the group attendance report).
Setup Shared Group Report
Create a new comprehensive report as before
Add a “Group Individual Attendance” built-in report as an item
Set
Date Range this calendar year
Status active
Check hide times attended
Select Group category for groups of interest
Add to report
Generate report
Note that if any group names have “&” in them the GHC connector will fail. Replace with “and”.
Share
Set Access to Anyone with the link
Copy the link to the clipboard
Close
Setup group attendance report
Create group for GHC connector to access report
Add Group
Group Name must be: “Report of Group Individual Attendance”
In the group Address field, paste the report link from the clipboard
Save
Group with link to group report
Does your Setup Checklist look like the one below (all green, no spanners/errors)?
The Setup Checklist will show your progress through connection setup
If your Setup Checklist shows errors then:
return to the step that’s not green using the drop down menu above and review instructions
ensure both comprehensive reports are shared to all who have the link (otherwise GHC can’t read it)
In some cases changes you make after initial setup won’t be instantly reflected in the Setup Checklist. If you believe you have fixed the issue highlighted simply go to the relevant page of the toolkit and see that data is being pulled through.
The first time you open any GHC dashboard it will throw up some errors and prompt you to authorise the connector. We’ll step you throw that now.
Access Your API
Firstly you’ll need to grab something from Elvanto. GHC connects to Elvanto through what is called the Application Program Interface (API). This is a secure method but do not share your API key with others. It is good practice to only have one API key user for each church.
Note: you must have permission access of super admin to access the API key
Step 1: In the admin page of your ChMS select settings. Scroll to the bottom and under the Developers heading select API
Step 2: Next to ‘Your Secrete API Key is” click “Show” and copy the key for the next setup step
Accessing Your API Key
Authorise Your Dashboard Connector
Go to the browser tab with your HEALTH CHECKUP (or open it from the onboarding sequence) and authorise the GHC connector.
Once the following screen appears, click “Authorise” and paste your API key.
Authorising Your Dashboard
Check Your Setup
Data should now be flowing in!
Before diving in you should check that the setup was done correctly in the previous step. Go to the “Setup Checklist” page under “Setup”.
Open Setup Checklist
Verify the correct people categories have been identified as “member” categories
Verify the correct group categories have been identified as “discipleship groups”
In 5-10 minutes you’ll be seeing real time health insights about your church! In these first steps you’ll be guided through preparing your Elvanto setup in preparation to connecting GHC.
5 Assumptions We’ve Made to Help You Connect GHC (and better use Elvanto!)
People’s details are recorded
People are assigned a people category related to their “connected-ness” to your church (eg Newcomer, Member).
People are added to groups in a category for small group ministry.
People are designated in serving positions as Volunteers
Congregations are designated by distinct locations (this assumption doesn’t have to be true for GHC to work however you won’t be able to filter by congregations if it isn’t true)
The first part of of this setup will involve preparing your Elvanto account to connect with GHC. The process of setting this up and using GHC will also help you use Elvanto better.
1. Assign People Categories
People categories help map the movement of people from newcomer to members. You might have several people categories that represent newcomers and members but these two basic concepts is important to differentiate. The goal is that we want newcomers to become members and we want members to express their membership in attending, serving and discipleship (and giving).
So that the GHC connector knows what people categories to look for in your system please demarcate the people categories by selecting Admin > People > Categories:
Connection with Church
People Category Demarcation
Member of your church / people who call your church home
Add an underscore (_) suffix to these people categories OR change the highlight colour of the people category to end in 1 (e.g. #000001)
People in your database that are neither newcomer nor members and you don’t want diluting your stats (e.g.
Add an asterisks (*) suffix to ignore these people categories
Newcomers
All remaining people categories. Note that GHC will only include those in these caetgories in the last 12 months. They’re not really newcomers otherwise! Our data quality page will show where there might be issues here!
Consider this example:
2. Assign Discipleship Group Categories
Everyone’s Elvanto has a stack of groups! GHC will know which of your groups are discipleship groups by completing this step.
In a similar way to people categories, demarcate the category of “discipleship groups” with an underscore . Do this by going to Admin > Groups > Categories:
Add a “_” suffix to any categories you consider a discipleship groups. Do not do this for individual groups. GHC doesn’t go looking for them like that.
Consider this example. Any groups within the categories “Growth Group” or “Youth Discipleship Groups” will be considered discipleship groups in GHC
The standard group health add-on is different to the turbo version of this. We’ve embedded a separate source in a turbo specific version of the dashboard that these instructions will guide you through. It should take a matter of minutes to complete. In summary the steps are
(1) Open and copy the turbo-specific add-on. This may cause metrics to show errors (don’t worry about)
(2) Update source and set routine extraction
(3) Establish share settings
(4) Save Link
1. Open and Copy the Turbo-Specific Add-on
Open the following turbo’d flow health. It defaults to using demo data. You will extract your data in the steps below. Once you’ve opened it make copy.
The standard flow health add-on is different to the turbo version of this. We’ve embedded a separate source in a turbo specific version of the dashboard that these instructions will guide you through. It should take a matter of minutes to complete. In summary the steps are
(1) Open and copy the turbo-specific add-on. This may cause metrics to show errors (don’t worry about)
(2) Update source and set routine extraction
(3) Establish share settings
(4) Save Link
1. Open and Copy the Turbo-Specific Add-on
Open the following turbo’d flow health. It defaults to using demo data. You will extract your data in the steps below. Once you’ve opened it make copy.
Read this before proceeding with account transfer:
It is good practice to create a general account as your admin. For example office@church.com (or even ghc@church.com) rather than mike@church.com. The first case means you have a consistent central account that won’t be effected by changes to your team. The latter case means that if “Mike” is the account owner and leaves the team you have to go through this process!
[Find_Turbod_Dashboards]
Changes that the new admin will need to implement in their google account:
The dashboard copies that are shared with your team reside locally in your google account. You will either need to:
1. Transfer the ownership of these to the new account. This only works if you are on the two users are within the same domain and you do not have turbo’d data sources. You can see how to transfer dashboard ownership here.We would encourage you to do this now before selecting transfer ownership below.
OR
2. New account owner to reconnect GHC to your church management system and re-save dashboard links. This should only take 10-15minutes in total. If you proceed with this option we’ll guide the new account user through setup by resetting their account. Until the new user sets up the new dashboards the team will be unable to view dashboards.
Proceeding with Transfer
Select how you will handle the Looker Studio Dashboards for the new account. In pressing either of these buttons we will also automatically transfer GHC billing details and privileges for the new user.
Turbo dashboards load your data nearly instantly and allow you to filter and explore your data just as fast.
This is possible because turbo data is cached once a day. So the tradeoff is that it’s not perfectly real time data.
In this setup you will
create new a new copy of the checkup
setup extracted cached data sources
save the new copy back into myGHC for future access
As with all of our sharing instructions we encourage you to split your screen to see both dashboards that you’ll open up in the next steps and this page.
Open and Copy the Turbo-Specific Dashboard
Open the following turbo’d dashboard. It opens with demo data that you can ignore.
If you’re prompted by a Google settings dialogue box (enter country and company name) then simply complete it and select “Make a Copy” again.
When making a copy you’ll be asked confirm data sources. Simply hit “Copy Report”. These three sources are streams of data from Planning Center that will be cached.
You’ll then see a behind-the-scenes looking page that looks broken. Don’t fret! Simply go to the next step of the instructions and we’ll help you set up the extraction to cache your data.
Create new data source and set extraction
Go to Resource menu > Manage Added sources , click edit for the only available source,
Begin by clicking “Edit” for the “Planning Center Organization” data source. You might be prompted to Authorise when you edit this source. Proceed in authorising. Then click “Reconnect” in the top right corner and “Done”.
Click edit on each of the remaining two sources (with lightening bolts in them).
Toggle “Auto Update” so it’s active (see screenshot below). Select a time that’s not 8am (we encourage our users to diversify their extraction times to love the Planning Center API servers!). This extraction time is when your data is cached and frozen. So any updates to your database won’t be refreshed in our dashboards until the next extraction cycle.
When you hit “Save and Extract” it might take a while to cache the data. Be patient.
Repeat for the remaining data source.
Then click “Done”, “Close” then “View” (to exit edit dashboard mode) and you should return to viewing the dashboard with your data.
Establish Share Settings
You can save this dashboard back into myGHC. You’ll be prompted to enter the link in the next step. Before you simply copy the URL we suggest we you set the sharing scope (unless it’s just you looking at this dashboard in which case you can skip this step).
Click the “Share” button in the top left to open a dialogue box with sharing options.
[share_methods_content]
Save Turbo Link
Save the dashboard shareable URL back into myGHC so you and your team access.
If you are want to update a pre-existing turbo dashboard simply repeat these steps. Go to top.
Simply add google account(s) in the “Add People” tab. Each person you add will be able to view your metrics.
If you’re using a medium/large church plan you can see all users here:
[return_google_accounts_in_team]
⚠️ Selecting “anyone with the link” or “anyone on the internet” breaches our teams and conditions since you are not able to control the security of your data since the link can be shared without restriction.
Workflows are immensely powerful. But can be difficult to administer as well as see an overall assessment of your flow. With GHC workflows are now easy to view and manage.
This method of defining the scope of permissions for dashboard sharing is the easiest and most flexible method. You will guided through the method to setup a group which will have a dedicated email address assigned to it. It’s this email address you’ll use to establish the share permission scope. It means you just need to put one email in all dashboards and modify the group to effect all permissions. The method is also integrated into myTeamGHC if you are a subscriber.
Substep 4 of 5: Leave default settings and create group
Substep 5 of 5: Save your group email
Save your google group email into myGHC
[google_sharing_preference_setting]
Proceed to the next step to add people to your group who will be able to see your dashboards.
Add members to your group
Substep 1 of 2: Select “People” in left pane and then “Add members” from top button.
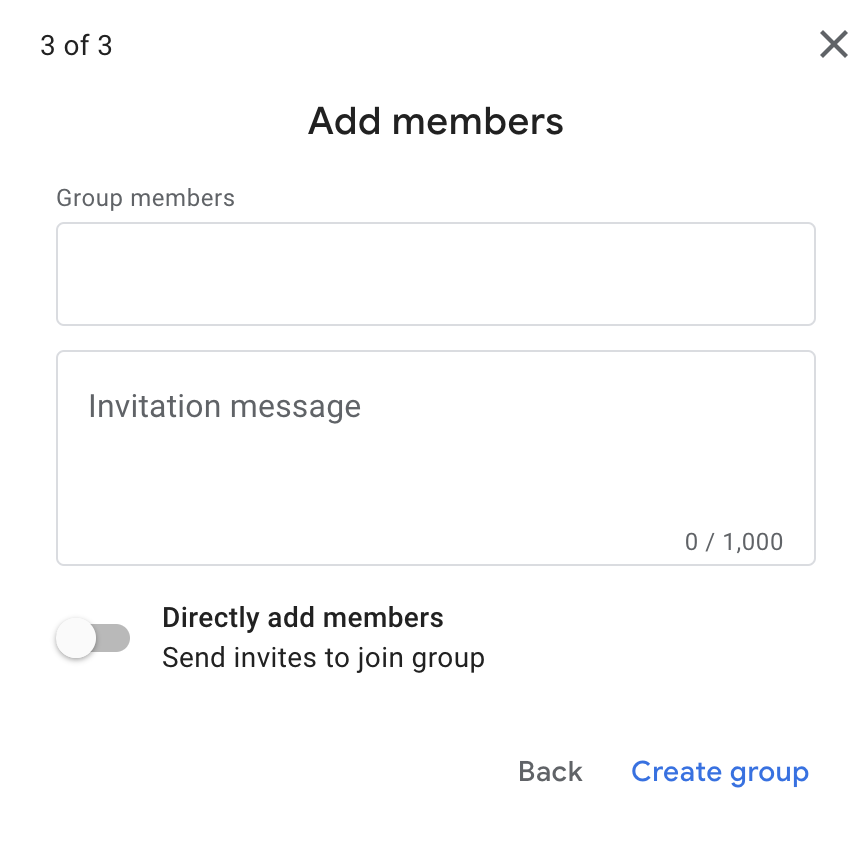
Substep 2 of 2: Add members
Select “directly add members” (it might confuse users to get an email from a googlegroups email asking them to be a member of the group).
Do not worry about group managers or owners.
Repeat this for as many members you have in your groups.
Add this group to GHC dashboards
Simply add the google groups email to all your dashboards in the share settings of each dashboard and remove people who have been added individually at the dashboard level.
Figure 1: Add new google group access
If needed you can remove previously added individuals using the ‘manage access’ tab.
Figure 2: Remove previously added individuals
In summary: You no longer need to manage which users can access dashboards within each dashboard. Rather this is now done within a google group.
Advanced considerations:
You could create multiple groups if different dashboards need different audiences
You could also create a group with view access and another group with edit access. This view/edit distinction would be made at a dashboard level
Note that myGHC front end only has ability to save one google group.
Lorem ipsum dolor sit amet, consectetur adipiscing elit, sed do eiusmod tempor incididunt ut labore et dolore magna aliqua. Risus feugiat in ante metus dictum at tempor commodo. Pharetra pharetra massa massa ultricies. Amet mattis vulputate enim nulla aliquet porttitor lacus luctus. Scelerisque felis imperdiet proin fermentum leo vel orci. Neque laoreet suspendisse interdum consectetur libero id faucibus nisl. Porttitor lacus luctus accumsan tortor. Eleifend quam adipiscing vitae proin sagittis nisl rhoncus. Pellentesque elit eget gravida cum sociis. Nunc scelerisque viverra mauris in aliquam sem fringilla ut morbi. Mattis vulputate enim nulla aliquet porttitor lacus luctus accumsan. Laoreet id donec ultrices tincidunt arcu non. Libero justo laoreet sit amet cursus sit amet. Nisl suscipit adipiscing bibendum est ultricies integer quis auctor. Nisl vel pretium lectus quam id leo in.
Heading 2
Id cursus metus aliquam eleifend mi in nulla. Arcu risus quis varius quam quisque id diam. Donec enim diam vulputate ut pharetra sit amet aliquam. Nulla aliquet enim tortor at auctor urna. At augue eget arcu dictum varius. Aliquam ut porttitor leo a. Ut consequat semper viverra nam libero justo. Nibh praesent tristique magna sit. Nullam vehicula ipsum a arcu cursus vitae congue mauris. Adipiscing tristique risus nec feugiat in fermentum. Auctor elit sed vulputate mi sit amet mauris commodo quis. Turpis tincidunt id aliquet risus feugiat in. Ridiculus mus mauris vitae ultricies leo integer malesuada nunc. Lectus mauris ultrices eros in cursus. Urna nec tincidunt praesent semper feugiat. Mauris vitae ultricies leo integer. Tortor posuere ac ut consequat semper. Integer vitae justo eget magna fermentum iaculis eu non. Arcu cursus vitae congue mauris rhoncus aenean vel. Egestas sed sed risus pretium quam vulputate dignissim suspendisse in.
Heading 3
Aliquam eleifend mi in nulla. Scelerisque eu ultrices vitae auctor eu augue ut lectus. Venenatis a condimentum vitae sapien pellentesque habitant morbi. Leo integer malesuada nunc vel. Gravida arcu ac tortor dignissim. Condimentum id venenatis a condimentum vitae sapien pellentesque habitant. Consequat mauris nunc congue nisi vitae. Massa sapien faucibus et molestie ac feugiat sed lectus. Consequat nisl vel pretium lectus quam. Gravida cum sociis natoque penatibus. Viverra adipiscing at in tellus. Feugiat pretium nibh ipsum consequat nisl vel pretium lectus. Nisl rhoncus mattis rhoncus urna. Amet luctus venenatis lectus magna fringilla urna porttitor rhoncus dolor. Commodo sed egestas egestas fringilla phasellus faucibus scelerisque eleifend. Proin libero nunc consequat interdum varius sit amet mattis vulputate. Dui nunc mattis enim ut tellus elementum sagittis vitae et. Massa eget egestas purus viverra accumsan in nisl nisi scelerisque. Arcu cursus euismod quis viverra nibh cras pulvinar mattis nunc.
Heading 4
Aliquet nec ullamcorper sit amet risus. Semper auctor neque vitae tempus quam. Habitant morbi tristique senectus et netus et malesuada fames. Scelerisque mauris pellentesque pulvinar pellentesque habitant morbi tristique senectus. Scelerisque fermentum dui faucibus in ornare quam viverra orci sagittis. Ac tortor vitae purus faucibus ornare suspendisse sed. Dolor sit amet consectetur adipiscing elit pellentesque. Enim tortor at auctor urna nunc id. Id diam vel quam elementum pulvinar etiam non quam. Lacus suspendisse faucibus interdum posuere lorem ipsum dolor sit amet. Aenean vel elit scelerisque mauris pellentesque pulvinar pellentesque habitant. Ut ornare lectus sit amet est. Nisl condimentum id venenatis a condimentum. Imperdiet nulla malesuada pellentesque elit eget gravida. Interdum velit laoreet id donec. Neque vitae tempus quam pellentesque. Ultrices eros in cursus turpis massa tincidunt dui ut ornare. At urna condimentum mattis pellentesque id nibh. Duis ut diam quam nulla porttitor.
Heading 5
Lectus proin nibh nisl condimentum id. Euismod lacinia at quis risus sed. Ut lectus arcu bibendum at varius vel pharetra vel turpis. Nibh tortor id aliquet lectus proin. Ac placerat vestibulum lectus mauris ultrices. Sem fringilla ut morbi tincidunt. Ipsum nunc aliquet bibendum enim facilisis. Enim neque volutpat ac tincidunt vitae semper quis. Tortor pretium viverra suspendisse potenti nullam ac tortor vitae. Amet aliquam id diam maecenas ultricies mi eget mauris pharetra. Lectus nulla at volutpat diam ut venenatis tellus in metus.
Better inform your service volunteers for ministry together
[subscription_active]
GHC Notify is a utility that sends regular scheduled emails to your rostered volunteers so they can see any combination of the following:
Service Plan
Make sure your volunteers know how their ministry contributes to the service
Who’s on (and confirmed)
Now your volunteers can see easily who else is involved the service and who is yet to confirm
Songs
Include links to song resources to equip musicians and service leaders
+ You can choose what content is sent, who gets it and when they get it!
And it’s all automated allowing you to focus on using Elvanto well and distributing information from there so that volunteers can better focus on their ministry to others and with others.
[switch_notify_content ‘unsubscribed’]
It’s really easy to setup GHC notify..
Authorise GHC
Authorise GHC notify in Elvanto
Configure Control Group
Define who gets what when through parameters set in an Elvanto group. You also have the option of setting multiple groups to send multiple emails to various groups.
… then simply let GHC Notify keep your volunteers informed
Sample Email with Service Plan and Volunteer listing. Download sample.
❌ No need to have your volunteers log into Elvanto and swap between tabs finding out who’s doing what when.
❌ Don’t write custom email and try and attach PDFs to try and get service details into the hands of those who need it.
The GHC Notify integration will securely access the service information in your Elvanto and use it to send notification emails individually to rostered volunteers using the Sendgrid email service. No personal contact details of other volunteers is included .in the emails
2. Why does this cost?
The GHC Notify service subscription of $5 per month covers the cost of the reliable and secure Sendgrid email delivery system, and providing ongoing support and development. It is in addition to any other GHC subscription.
3. How do I get support
When you subscribe you will unlock detailed documentation for GHC Notify on this page. If that is insufficient then please use the support tab in the myGHC portal (accessible via login).
Subscribing is easy…
Step 1. Sign up or log into myGHC
[ghc_notify_signuplogin]
Step 2. Subscribe using form below (only visible when signed into myGHC).
Step 3. Follow the setup instructions (5minutes). Once you’ve subscribed simply refresh this page and you’ll be able to view detailed documentation for setup and managing GHC Notify.
[billing_user_content ‘Only the billing user can start subscription to GHC notify’]
Start using GHC Notify today…
[/billing_user_content]
[/switch_notify_content]
[switch_notify_content ‘subscribed’]
Introduction
This documentation includes basic setup, customising settings, best practice and FAQ. Use the navigation above to jump to relevant section.
There are two main steps to initially setting up GHC notify
Authorise GHC
You’ll need to first establish the connection between GHC and Elvanto. Jump to instructions…
Configure Control Group
We use a specially created group in elvanto to control the parameters that drive the automated notifications to volunteers. Jump to instructions..
… then simply let GHC Notify keep your volunteers informed
A sample GHC Notify email with service plan and volunteer list. Download sample
Initial Setup
Step 1. Authorise GHC
GHC Notify operates as an Integration in your Elvanto. The following steps will set up the Integration between Elvanto and GHC Notify. They can only be carried out by an administrator of your Elvanto account. This setup only needs to be done once.
Before you start, make sure you have set up the timezone in your personal Elvanto profile (GHC Notify uses that setting to determine the correct times of your services and notifications).
Then add an integration to your elvanto as follows:
1. In Elvanto, navigate to Settings (from the top right menu) and select ‘Integrations’
2. Click on Add Integration
3. Choose Custom
4. Enter (copy/paste) the details as below. Click Save to complete.
5. Click on the integration you just created and this time the Client IDand Client Secret fields will be filled in. You will need to enter these values into the GHC Notify registration page at the link below. Open the link below in another browser window.
In the Sub-domain prefix enter your churches elvanto sub-domain. For example, if your elvanto URL is tac.elvanto.com.au then Your Sub-Domain prefix: = tac).
copy/paste the Client ID and Client Secret from Elvanto (the ones generated in previous step)into their respective fields.
Then, click on Proceed and click on Authorise on the next screen to connect back to your Elvanto.
7. You must now login to Elvanto using an administrator username and password. Click Allow Access to the 5 roles listed.
8. You should be presented with a Completion screen confirming that authorisation has succeeded and you are now able to supply your contact details to complete your setup. When you have entered your details, click Complete, then close this tab and also close the Authorise tab from step 7.
(If you get a message that the authorisation has not succeeded, you will need to return to step 6 above.)
9. You are now ready to configure roster notifications in your elvanto.
Step 2: Configure Control Group
GHC Notify is controlled by you through your elvanto using special Groups in elvanto called sending control groups.. Each group configures a separate notification which may be for all services or a single service. The group fields are used to configure different aspects of the notification content and when it is sent.
When you set up GHC Notify (above), a group called GHC_Notify Service Roster was created in your Elvanto and your person profile was added to that group. The default settings for that new group (see below) will send you a weekly roster notification on the specified weekday showing all volunteers at any services in the coming week. Note that no rostered volunteers will be notified until you enable this.
The default group will have these basic settings:
Send admin (you) basic template every Wednesday at 2pm
Since “Description” is blank it will default to the following email body:
Hi %firstname%, Here is the roster for %service_date% : %person_positions% %service_rosterplansongs$
Group Fields
The following group fields are used to configure the notification content and timing:
Group members
People added to the group as members will ALWAYS receive a roster notification, whether they are a volunteer at the service or not. Add the people who need to receive every notification (eg admin or pastor).
Note: black list people feature. If you need to prevent a volunteer from receiving notifications you can disable them by adding them to the group and assigning them the position of “No Email” (you may need to define this position in the group category)
Meeting start time and end time
this is the time the notification will be sent – sometime in this hour
Meeting frequency and day
pick the day for weekly notifications
Description
will be sent as the body of an email to the volunteers.this text is the template for the report
Locations
defines the services that are scanned for volunteers
Address
Define the sending address for email notifications
Customising Sending Settings
The steps below explain how to customise the settings in the sending control group to meet your needs. Also refer to the graphic below which contains links to jump to relevant sections.
Customise the notification sending day and time
Configure the sender email address
Select the service locations and departments for which notifications will be sent
1. Customise the notification sending day and time
The group meeting Start TIme, End Time and weekly day fields control when your notifications will be sent to volunteers. Set the times to whole hour periods and the notifications will be sent sometime in that hour. You will be sent a report after the notification run to let you know who was notified.
2. Configure the sender email address
The group meeting Address field holds the email address that the notification is sent from. Initially it is set to the name and email of the person who setup the GHCnotify integration. You can edit this to an office or admin address if you wish. The format is
Display Name [space] <email address> … eg Church Office <office@mychurch.org>
3. Select the service locations and departments for which notifications will be sent
The group Location control can be used to restrict the services for which notifications are sent. When no locations are selected, all services will be notified. By selecting one or more locations, only volunteers in Services at those locations will be notified.
The group Departments control can be used to restrict the positions for which notifications are sent. When no departments are selected, all positions will be notified. If a department is selected only positions in that department will be notified. If a sub-department is selected only positions in that sub-department of the department will be notified.
4. Customise the content of the notification email
The group Description field is used as a template for the notification email that is sent. If this field is blank a default generic template is used. The template recognises special %..% placeholder fields to embed dynamic content.
A suggested version is
Dear %firstname%,
You are currently rostered to participate in Church Services on %service_date%:%person_positions%
The Service Plan and Serving Positions below are for your information. If you have any queries, please contact one of the leaders or check at church. Thank-you Church Office ————- %service_rosterplansongs%
The following %…% placeholder fields are recognised
%firstname%
The first name of the recipient (volunteer).Their preferred name is used if available.
%service_date%
The first date of the services at which the recipient is rostered
%person_positions%
A summary of the services and positions the recipient is rostered at
%service_roster%
Embeds a table of positions and volunteersThis is a minimal volunteer list appropriate for general serving positions on the day.
%service_rosterplan%
Embeds a table of positions and volunteers followed by a table of service plan items.This is helpful for positions active within the service,
%service_planroster%
Embeds a table of service plan items followed by a table of positions and volunteers.This is helpful for positions active within the service,
%service_rosterplansongs%
Embeds a table of positions and volunteers followed by a table of service plan items and a table of service songs with links to resources.This is most useful for musicians and also to provide complete information to everyone
%service_notifyrosterplansongs%
Embed volunteer, plan and song tables but only include those volunteers in the selected departments rather than all volunteers in the service.This is intended for musicians to only include the music team in the list of volunteers
%service_rosterplanbrief%
Embed volunteer, plan and song tables but only include titles of the items in the service plan.This is intended for people such as musicians who need to know what’s in the service but not the full detailed content.
5. Send yourself a test notification
To send yourself a sample notification, enter TEST in the group meeting State field and Save.
Sometime in the next hour only group members will receive a notification
The state field will be cleared to prevent further notifications being sent.
6. Create multiple distinct notification senders
You may wish to send different notifications to different departments for a service (eg roster only for general servers, full plan and songs for musicians) or different notifications to different services. You can do that by setting up multiple sending control groups and customising them accordingly. For GHC Notify to find those groups, they need to be in a specific group Category.
GHCnotify recognises sending control groups as:
A group named GHC_Notify Service Roster
Any group in a category named GHC_Notify Service Roster Sending
To enable additional sending control groups, create a group category in elvanto named GHC_Notify Service Roster Sending and assign new groups to that category.
This will allow you to assign more meaningful names to the groups themselves (eg Morning Service Roster).
You will need to configure each of the relevant control fields in the new groups manually. Start by copying the settings in your default group and then modify from there. You can TEST each control group separately.
7. Activate notifications to volunteers
By default, notifications are only sent to members of the sending control group. These are typically staff and admins who wish to receive notifications regardless of whether they are in the roster or not. You should not add rostered volunteers to the group.
When you have the notification content configured, you can activate the sending of notifications to volunteers by entering ACTIVE in the meeting state field.
8. Deactivate notifications to volunteers
There are a number of options to deactivate some or all notifications being sent:
To disable notifications to volunteers for a particular control group, clear the group meeting state field (remove ACTIVE)
To disable all notifications from a particular control group, archive the group (to preserve it) or delete the group.
To disable all notifications entirely from all groups, delete the GHC Notify integration.
9. Resend a notification
If you have ACTIVE in the state field you can add RUN or TEST after it and it will be executed in the next hour and the state reverted to ACTIVE.
You might add RUN if you discovered a mistake in the service and needed to resent to everyone
You might add TEST if you were experimenting with something and just wanted to send a notification to admins.
Good Practice
Sending Groups
Have just as many sending groups as you need. The dynamic and targeted design of the included content means that a single notification will often meet the needs of all services and positions.
Some churches have 2 sending control groups – a general one using the %service_roster% token to provide a list of positions and names for all volunteers (sometimes excluding up front positions) and a detailed one using the %service_rosterplansongs% token to provide more detailed service information for up front positions.
Sending Email
Delivery of notification email messages can sometimes be unreliable due to the actions of spam filters based on the content or sender.
GHC Notify uses the same SendGrid sending service as elvanto and can benefit from settings in elvanto to improve the reliability of email delivery. If you send using an address in the church domain, make sure that domain is configured in the Communications settings in your elvanto.
FAQ:
1. Is my data secure in using this?
The GHC Notify integration will securely access the service information in your Elvanto and use it to send notification emails individually to rostered volunteers using the Sendgrid email service. No personal contact details of other volunteers is included .in the emails
2. Why does this cost?
The GHC Notify service subscription of $5 per month covers the cost of the reliable and secure Sendgrid email delivery system, and providing ongoing support and development. It is in addition to any other GHC subscription.
3. How do I unsubscribe
If GHC notify isn’t working as you’d hoped then please let us know at support@growinghealthierchurches.com. If you wish to unsubscribe them you can cancel GHC subscriptions in the account page (payment tab).
Groups are an essential part of a healthy church and this add in lets you drill down into how healthy your groups are. It clearly shows how many members have joined groups, how often groups are meeting and who’s attending. Identify groups and people that might need encouragement or support.
GHC stats embeds analytics created in the toolkit back into elvanto (on a weekly basis). This allows metrics to be used in a wide variety of applications as part of customised reports and as part of pastoral processes. It requires a short setup that enables GHC to write into custom people fields.
Ever wondered who the 20% doing 80% of the work is? Are you spread thin or evenly across many? What departments need more resourcing? Answer these questions and more with this powerful new add-on.