You’re very close to seeing real time metrics!
This once-off setup process will take about 10 minutes to walk through. You’ll be guided through preparing your elvanto settings to connect with the GHC dashboard.
There are 5 assumptions we’ve made about your basic church management system setup. For GHC to work effectively you should be:
- People’s details are recorded
- People are assigning a people category related to their “connected-ness” to your church (eg Newcomer, Member).
- People are added to groups in a category for small group ministry.
- People are designated in serving positions as Volunteers
- Congregations are designated by distinct locations
The first part of of this setup will involve preparing your elvanto account to connect with GHC. The final step will authorise the GHC connector. This final step will include a setup verification checklist.
Video Walk Through
You can now use this walk through for a more detailed visual approach.
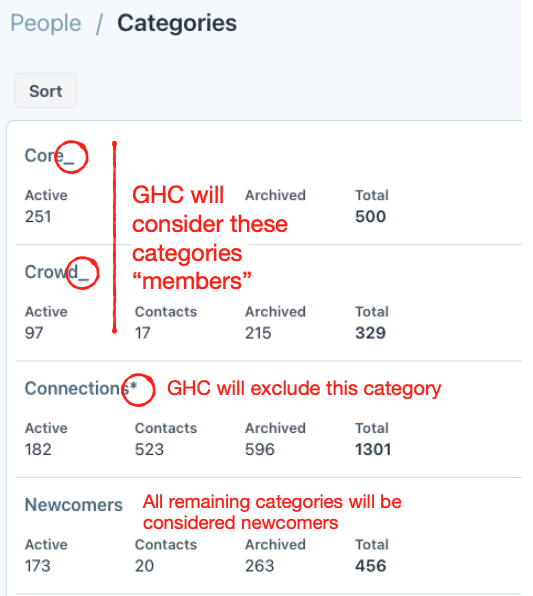
1. Assign People Categories
So that the GHC connector knows what people categories to look for in your system please demarcate the people categories by selecting Admin > People > Categories:
- Add a “_” suffix to any categories you consider “members *“
- Add a “” suffix to any categories you wish to exclude for analysis
- Leave any categories that would be considered for New People yet to become members
**As an alternative to marking member categories with a “_” you can modify the highlight colour of each appropriate category to end in 1 (e.g. #000001).
Problems with this step → Support
2. Assign Small Group Categories
Similarly to people categories, let the GHC connector know which of your group categories contain “small groups”. Do this by going to Admin > Groups > Categories:
- Add a “_” suffix to any categories you consider “small groups”

Problems with this step → Support
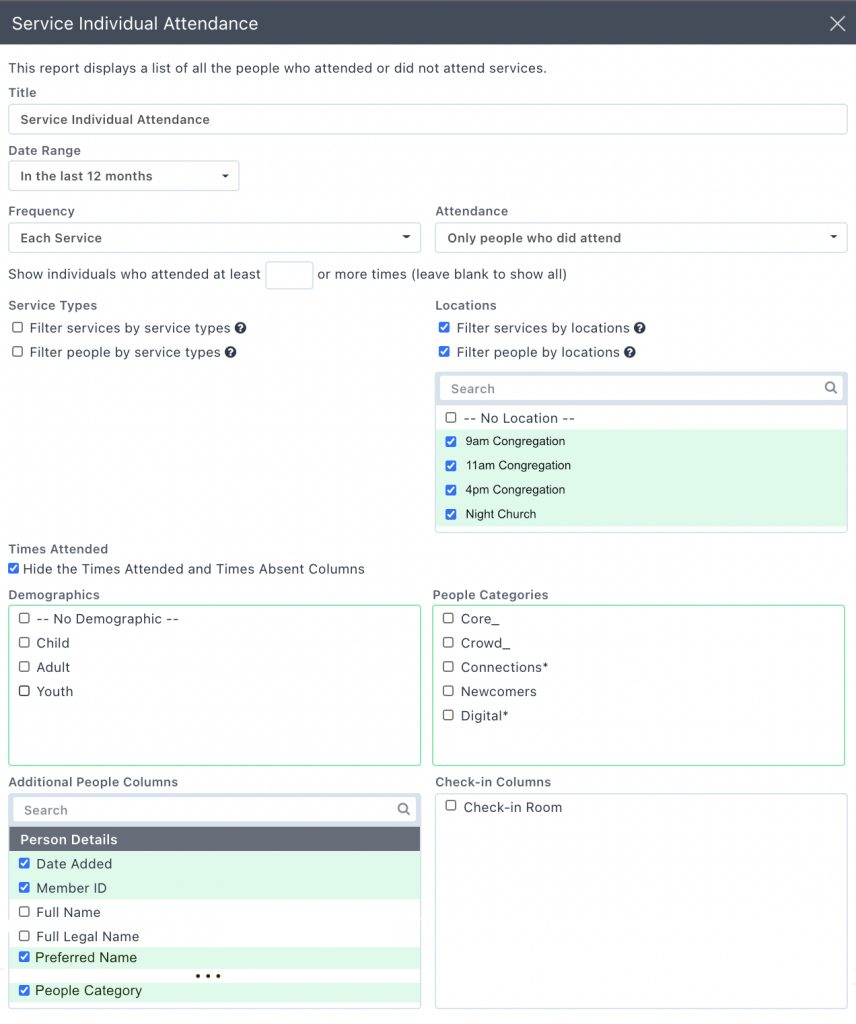
3. Setup Service Attendance Report
| GHC can directly access basic Elvanto data. It cannot directly access attendance reports. In the next two steps you will create service and group attendance reports. But even then GHC can’t access them… so we’ll get you to create some “dummy” groups that GHC can access and you’ll put the report links in the address fields of the groups (which GHC can access). This is the best method we’ve found to supplement the API connector. Follow the steps below and once it’s setup then you won’t need to worry about this again. |
Setup Shared Attendance Report
- Create a new comprehensive report (Admin > Reports page > “Add Comprehensive Report” button)
- Add a title (whatever you choose). You do not need a description or category.
- Click “Add Report Item” and select “Service Individual Attendance” built-in report as an item
- Set:
- Date Range last 12 months
- Only people that did attend
- Filter services and people by relevant locations
- Hide times absent and attended column
- Additional people columns
- Preferred Name
- Date added
- MemberID
- People Category
- Select “Add to report”
- Click “Generate Report”
- Click “Share”
- Set Access to Anyone with the link and copy link to the clipboard
- Close
Create group for GHC connector to access report
- Add Group
- Group Name must be: “Report of Service Individual Attendance“
- In the group Address field, paste the report link from the clipboard
- Save

Problems with this step → Support
4. Setup Group Attendance Report
You’ll now need to repeat the same process for the groups attendance report (including creating another “dummy” group for GHC to access the group attendance report).
Setup Shared Group Report
- Create a new comprehensive report as before
- Add a “Group Individual Attendance” built-in report as an item
- Set
- Date Range this calendar year
- Status active
- Check hide times attended
- Select Group category for groups of interest
- Add to report
- Generate report
- Note that if any group names have “&” in them the GHC connector will fail. Replace with “and”.
- Share
- Set Access to Anyone with the link
- Copy the link to the clipboard
- Close

Create group for GHC connector to access report
- Add Group
- Group Name must be: “Report of Group Individual Attendance”
- In the group Address field, paste the report link from the clipboard
- Save

Problems with this step → Support
Access Your API
Establish the connection of your GHC dashboard to your church management system using the API (application program interface) key. This is a secure method but do not share your API key with others. It is good practice to only have one API key user for each church.
Note: you must have permission access of super admin to access the API key
Step 1: In the admin page of your ChMS select settings. Scroll to the bottom and under the Developers heading select API
Step 2: Next to ‘Your Secrete API Key is” click “Show” and copy the key for the next setup step

Problems with this step → Support
Dashboard Setup Checklist
Open the GHC toolkit below. The link will take you directly to a setup checklist which will be used throughout this process to verify each step.
Authorise Your Dashboard Connector
The first time you open your dashboard you’ll be prompted to authorise connector. Once the following screen appears, click “Authorise” and paste your API key.

Does your Setup Checklist look like the one below (all green, no spanners/errors)? If yes confirm here.

If your Setup Checklist shows errors then:
- return to the step that’s not green using the drop down menu above and review instructions
- ensure both comprehensive reports are shared to all who have the link (otherwise GHC can’t read it)
In some cases changes you make after initial setup won’t be instantly reflected in the Setup Checklist. If you believe you have fixed the issue highlighted simply go to the relevant page of the toolkit and see that data is being pulled through.
Proceed to next step once all is working to finalise myGHC setup.
Complete: Real Time Metrics!
If your setup checklist shows you’ve completed setup successfully then confirm below…. because that’s it! You’re now ready to access all GHC dashboards.